ANSEL ADAMS LESSON PLANS

SCIENCE
Physics and Chemistry

 
NOTE: The chemistry activity at the end of this section is teacher-led only.

Physics

How does the simplest camera work?

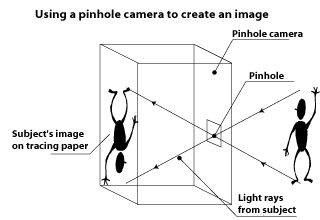
The word "camera" means room in Italian. It was in a dark room (camera obscura) in Italy many centuries ago that it was noticed that light from outside passing through a small hole exactly reproduced the scene outside on the opposite wall. It was astonishing. And also perplexing, because the image was upside down.

Why was the image upside down?

Light travels in straight lines. Light rays from the top part of the scene outdoors can only reach the bottom part of the receiving area (the opposite wall) through the tiny hole, and vice-versa. The image is dim and ill-defined because the light rays travelling from each point of the subject are slightly dispersed as they pass through the hole.

ACTIVITY

Find out how to make a pinhole camera in My First Photography Book by Dave King. New York: Dorling Kindersley, 1994.

diagram of pinhole camera

How can the image be made sharper?

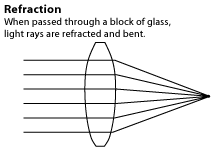
To produce a brighter and sharper image than is possible from a simple pin hole, it is necessary to converge the light rays and focus the image. This requires a lens. Study a prism to see how light is refracted or bent when it passes through.

diagram of light refraction

How is this knowledge used today?

The phenomena of the camera obscura (dark room) was put to use to help Italian Renaissance and Dutch artists make very realistic, "photographic" images, and later led to the development of the modern camera.


SCIENCE - Chemistry

How is chemistry used in photography today?
Today photographers use special paper that is coated with chemicals that are sensitive to light. In a dark room, they project light through a negative which is placed in an enlarger.

Can I make photographs without a negative and an enlarger?
Yes, but you still need a very dark room. A bathroom with a sink would work if you can use black paper or blankets covering the light. You can use a red darkroom light to help you see.

ACTIVITY FOR TEACHERS ONLY: To ensure your safety, before you do the following activity, go over the steps with the technicians at the photographic supply store. If you get any chemicals on your skin wash immediately. If you get chemicals in your eye, rinse immediately and see a doctor.

(Teachers - please call for specific chemicals and times)

PHOTOGRAPHY WITHOUT A CAMERA OR FILM NEGATIVE

Set up the room as above.
Gather all your materials: 3 trays, chemicals, measuring cups, thermometer, photographic paper, objects or cut oak tag

  1. Prepare three trays with solutions that will process your image. You will have to follow the instructions on the packets of how much chemical to use. You will also need a sink with running water.

    a. developer
    b. water
    c. fixer
    d. sink or bathtub with running water

  2. In a very dark room with only a special darkroom light, take one sheet of photographic paper out of the packet. Remember if you expose the paper to light you will ruin it! Place objects on the paper, such as scissors, string or oak tag with shapes cut out, a flower for example. Expose to bright light for 10 seconds.
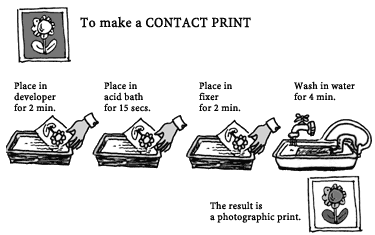
  1. Put the paper into the developer with tongs so the paper is completely covered. Use tongs to immerse paper into the chemical - do not touch it with your fingers. Rock the developer gently over the paper. Wait for 2 minutes or until you see the image come up. This is the exciting part!

    You should see an image of a flower or the object slowly come up. Except it will be IN REVERSE (a negative).

    Where the light was blocked, the paper will remain white, where light struck it, it will be dark. The chemicals on the paper are sensitive to light and begin to change the tone of the paper.
  2. Using a different set of tongs, put the paper into water for 30 seconds to rinse the developer off. Rock gently as before.
  3. Then using a third set of tongs, slip the paper into the fixer for 2 minutes to preserve the image.
  4. Wash the paper in the sink or bathtub with running water to remove excess fixer for 4 minutes.

illustration of how to make a contact print

Now you have the final image - a negative of the image you started with.

THE ABOVE ACTIVITY IS FOR TEACHERS ONLY!